Whatever the science is, it must have the most modern resources for its research and thus reach the results that allow its fixation on solid foundations.
However, electronic research devices, simple as it may be, when it is of the professional type, is practically inaccessible to the common researcher.
The curious ones, those who want to start their own research on a smaller scale because they do not have the resources, however, are not totally prevented from doing so due to the lack of equipment.
Simple hand-assembled circuits can perfectly help in the first steps and even be of great use in proving some important phenomena.
What we propose in this article is just that. A very simple, sensitive and very useful device, to be used in paranormal researches, and even in the biology laboratory.
Our psycho-investigator is nothing more than a combination of analog-to-digital converter with a sensitive multi-voltmeter or conductimeter.
With this device we can convert variations of resistance, which can be of the skin of a person used as a volunteer, to variations of the tone of the sound emitted by a loudspeaker; we can convert variations of leaf resistance of a plant into sound variations; or use various types of transducers to convert into sound, temperature variations, light, etc. (Figure 1)
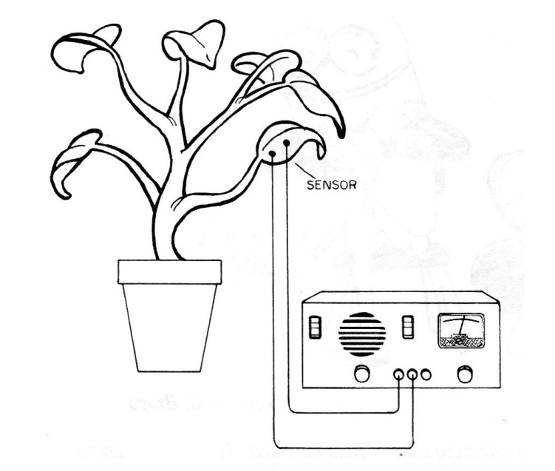
In a second function these small variations can be directly indicated on a sensitive instrument.
The device is extremely simple, very easy to handle, and yet, because it is powered by ordinary batteries, it is totally portable.
The researcher will easily be able to take it to the most diverse places, facilitating mainly those that perform field researches. (Figure 2)

As it is a much more dedicated project for those interested in non-conventional research than veteran electronic practitioners, we will describe the assembly in a very simple and detailed way, thus facilitating its execution.
HOW IT WORKS
In Figure 3, we have the block structure of our apparatus.
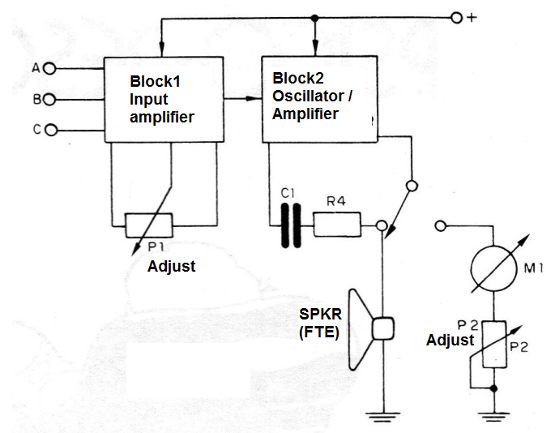
The first block represents the input circuit and has as basic elements a transistor, an adjustment potentiometer and three input terminals where the transducers or the research electrodes will be connected.
The behavior of this block will depend on the type of "thing" that is intended to be detected, but in general terms it is as follows (Figure 4):
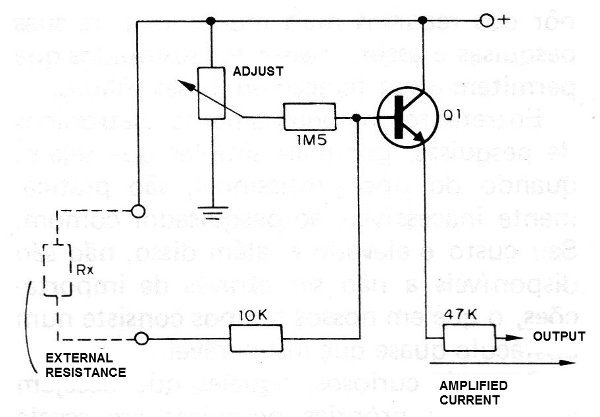
The transistor acts as an amplifier capable of increasing the intensity of the small currents which may appear to flow through terminal B.
Thus, by adjusting the potentiometer in order to balance the transistor in its polarization, we obtain a minimum current in the initial situation.
An increase in this initial current will then be amplified by the transistor, appearing on its emitter.
Note that this external resistance can be, for example, the skin of a volunteer who will hold two electrodes or a leaf of a plant. It is important to note that the presence of the transistor allows the current flowing through this external resistance to be extremely small, on the order of a millionths of ampère, thus unable to cause shock or any kind of damage to the living being analyzed, if this is the case.
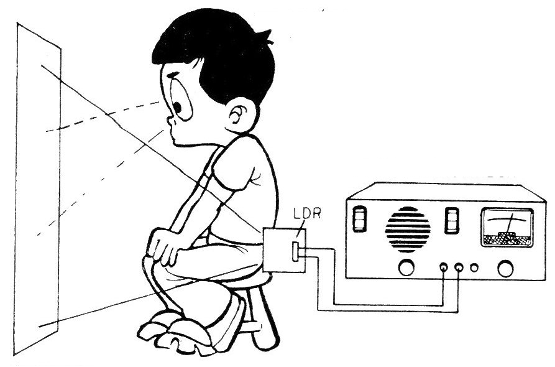
In the same way, we can connect sensors like a BA315 diode or an LDR, in which case the device will start to work with the quantities that these transducers feel.
In the case of the diode, we will have the perception of temperature variations and in the case of the LDR, the perception of variations of light.
In Figure 5, we show the LDR connection and how to "feel", in this case, variations of light reflected in a screen, for possible study of "mental projections" done in parapsychology, using to focus the LDR a small cardboard tube.
The currents amplified by the first transistor are sent to the second stage of the apparatus, which has dual function depending on the switch S1.
In a function, this key places in the circuit, formed by two transistors, a capacitor and a feedback resistor which make it work like an audio oscillator. The frequency of this oscillator will depend both on the value of C1 and also on the current that will be supplied by the first transistor, from the previous step. (Figure 6)
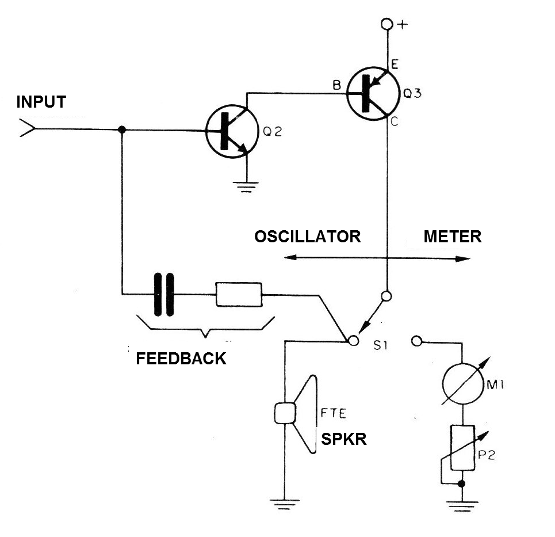
This means that variations in the current of this transistor which are amplified are converted into frequency variations. In this function, the output is connected to a speaker so that these frequency variations are heard in the form of sound variations.
In the other function, the two transistors of this stage function as DC amplifiers and feed a meter from the input transistor.
Current variations of the input transistor appear amplified in the meter.
The circuit is very sensitive and can be powered either with 3 V or 6 V voltage, i.e., 2 or 4 small batteries, which will have great durability.
THE COMPONENTS
The components used in the assembly are all common, being easily found at low cost in specialist houses.
The box is suggested in Figure 7, and may be of wood, plastic, or metal.
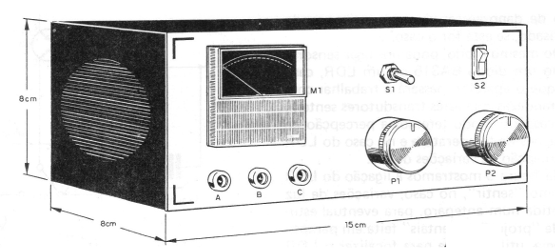
The speaker will basically determine the dimensions of the box, since this can be from the small type (5 cm) to the biggest (10 cm).
Transistors are commonly used. For Q1 and Q2, BC548 can be used or any equivalent such as BC237, BC239, BC547 can be used. For Q3, we have BC558 or equivalent such as BC307, BC308 or BC557.
Others may be tried as long as the type and termination are observed.
M1 is a common 200 uA VU-meter of the type used in sound equipment.
Choose one not too small, and have a scale, if possible, with linear marking, that is, where the separation of numbers is uniform. This will help you with the reading notes in the researches.
P1 and P2 are common potentiometers and their values ??are the data in the scheme. For P1, the reader can use as a better performance equivalent a potentiometer of 10 M, although it is more difficult to find.
S1 is a 1x2 (1 pole x 2 position) switch which can also be replaced with a 2x2 (half unused) switch. S2 is a simple switch.
The resistors are 1/8 W and the capacitors can be both ceramic and polyester. The marking of these capacitors can be done in different ways, depending on the type.
For polyester, we will have the brown, black and yellow stripes, from the opposite side of the terminals, and for the ceramics the marking can come as 100 n, 0,1 or 104.
The reader will also need support for 2 or 4 batteries, buttons for potentiometers, printed circuit board or terminal bridge, 3 different colored terminals for the inputs and wires.
ASSEMBLY
Assemblers with more resources can opt for the printed circuit board version, while those with less resources can opt for the bridge version, since the bridges can be purchased ready in pieces of various sizes.
The tools used are as usual: small power welder, cutting pliers, cutting pliers, screwdrivers, etc.
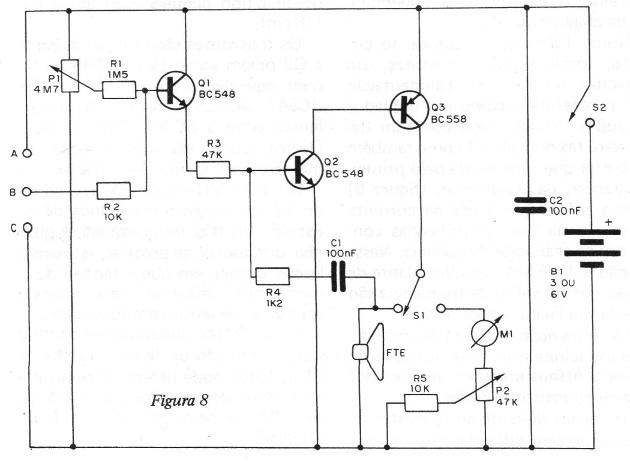
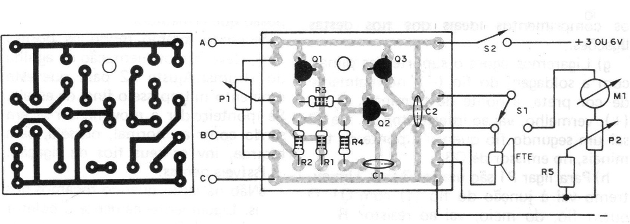
Figure 8 shows the complete circuit of the psycho-investigator.
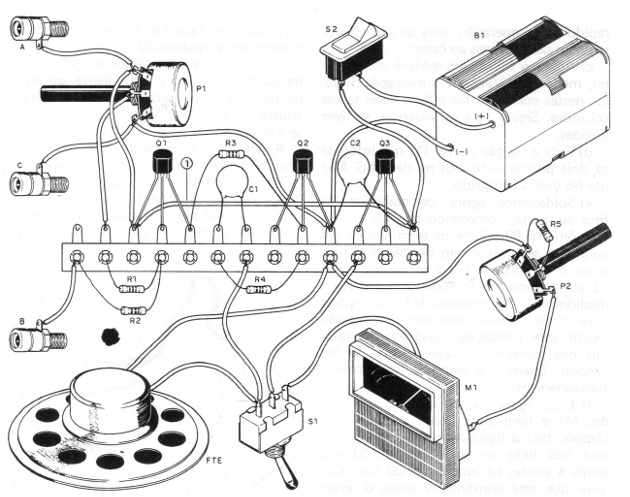
In Figure 9, we have the bridge version of terminals. Note that the terminals of the components, such as R3 and Q2, C2 and C3, which are not insulated, cannot touch each other except at the welding spots.
In Figure 10, we have the printed circuit board version.
For the bridge version, we give a sequence of precautions which must be observed, thus ensuring the success of the assembly:
a) Weld the three transistors first, observing that the flat part is facing upwards. Also see that Q3 is different from Q1 and Q2 because they are of different types. Welding must be done quickly, as these components are sensitive to heat.
b) Then, weld the capacitors C1 and C2, observing well the terminals of the bridge in which they are connected. Be careful so that the C2 terminal does not touch the terminals of Q3. Lift it up slightly if necessary. Be quick in this operation because the capacitors are also sensitive to heat.
c) Now the assembler will weld the resistors, minus R5. Note that the value labeling of these components is made by colored bands. Follow the material list if you have doubts.
d) Connect the wire (1) that connects the two points indicated on the drawing. Do not use very long wire.
e) We will now weld the components off the bridge, starting with R5 in the potentiometer P2. Cut the terminals of R5 to fit it in position and then weld. Then, connect a wire from P2 to the terminal bridge and another wire to the M1 meter. On the M1 meter the connected wire should go to the marked terminal (-). If this marking does not exist, connect to any of the terminals, because then, if necessary, we will make the inversion, depending on the operation.
f) Now connect switch S1 to meter M1 and also to the terminal bridge. Then, connect the two-wire speaker to the S1 switch and the other to the bridge at the junction of Q2 and C2. See that it will be convenient for the reader to first verify exactly how you are going to attach all of these parts to the box, and thereby determine the ideal lengths of the wires of these connections.
g) We will now connect the battery holder with the black wire (-) welding to the terminal bridge. The red wire goes to switch S2. From S2 a second wire goes to the terminal bridge on the emitter of Q3.
h) 3 wires are used to connect P1. One end goes to the junction of the wire (1) with O1. The other wire from the middle goes to the resistor R1, and finally the lower end goes to the junction point of Q2 with C2.
We complete the assembly with the connection of the three terminals (A), (B) and (C) at the points indicated in the drawings.
After all this, the reader should carefully check their assembly and, if everything is in order, can run a test for the operation.
TEST AND USE
Insert the batteries into the holder, observing their polarity. Use new batteries. Switch on the appliance by pressing S2.
Then, initially set the switch S1 to the position which connects the speaker, i.e., in the analog / digital converter position.
By adjusting P1, you should hear a whistle if the switch is in the right position.
Set P1 to the point just below the point where the whistle disappears.
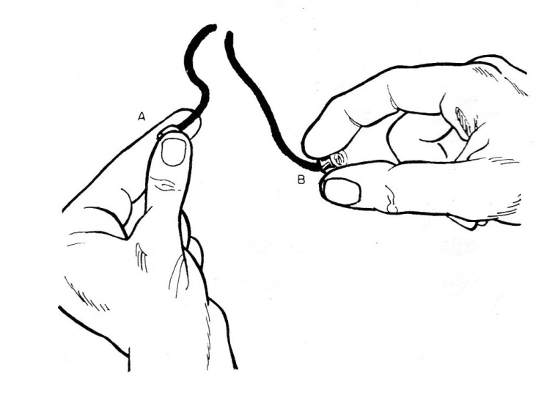
Now, placing your fingers, one on the A terminal and the other on B, there must be sound emission. The tone will depend on the pressure made with the fingers when holding these terminals. (Figure 11)
Release the terminals and turn the switch S1 to the position which turns the meter on.
Holding the A and B terminals in the same way, the needle of the instrument must be moved. Adjust P2 so that this movement does not exceed the end of the scale.
If the pointer tends to move anticlockwise, that is to the left, reverse its connecting wires.
Possible problems:
a) There is no oscillation when we touch the terminals. Momentarily turn on the collector and Q1 emitter. If the sound occurs, the problem will be at Q1 or at P1. If nothing happens, check Q2 and 03 and their connections.
b) The instrument remains constantly at its maximum. Turn off resistor R3 momentarily. If nothing happens to the meter, Q2 or Q3 has a problem. If the pointer drops to zero, it is a sign that the problem is in C1.
Once the operation is verified, the reader can use it.
There are several possibilities of use for the psycho-researcher. In most of them the reader will need electrodes that will be connected to the terminals through pins, as shown in Figure 12.
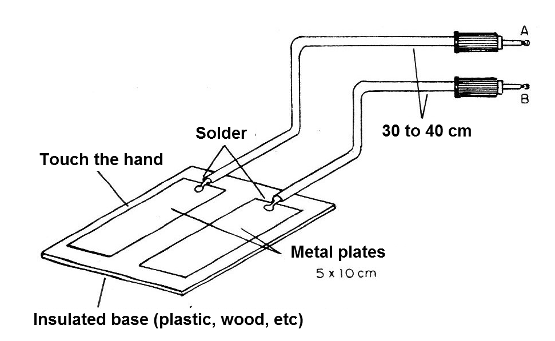
In this same figure, we show the use as a "psycho-galvanometer", or lie detector, to detect small variations of the skin resistance of the subject in evidence.
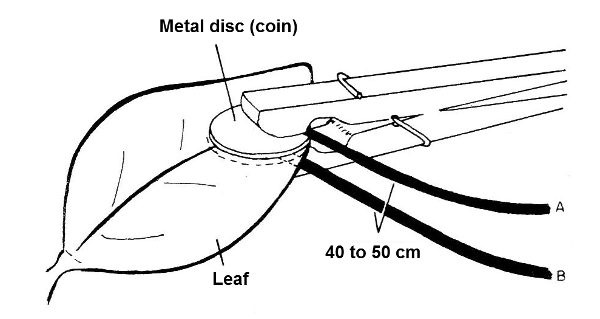
In Figure 13, we show the connection of the apparatus in a plant leaf for detection of its possible biological activity with variations of resistance (phytobiônica).
For the use with sensors such as a BA315 (temperature) diode or an LDR (light), we have the connection in Figure 14.
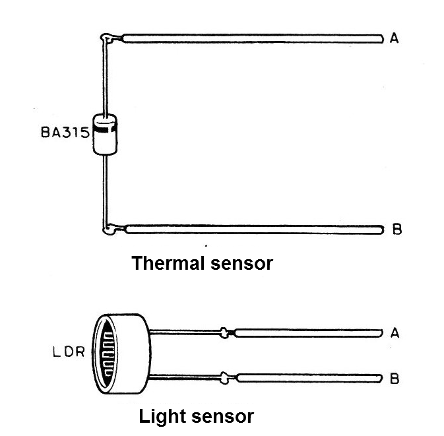
In the case of the diode, it is important to observe its polarity and also its readiness, that is, it has a certain inertia which prevents the answers to be immediate.
CONCLUSION
The type of research to be performed, the interpretation of the data collected and also the way of using the apparatus will depend greatly on the preparation of the reader in the area targeted.
Note that it will not be possible in the first experiment which concrete data can already be obtained. The reader should first study how to use the device, eliminating possible sources of interfering information, then programming the experiments and finally arriving at their conclusions.
Not even with the professional gadgets is the thing so simple and straightforward, let alone one that is not meant to be more than a hand-crafted montage for initiation.
Q1, Q2 - BC548 or equivalent - NPN transistors
Q3 - BC558 or equivalent - PNP transistor
MI - 200 uA VU
FTE - 8-ohm speaker
P1 - 4M7 or 10 M - potentiometer
P2 ~ 47 k - potentiometer
C1, C2 -100 nF - Ceramic or polyester capacitors
S1 - 1 x 2 key
S2 - single switch
R1 - 1M5 - resistor (brown, green, green)
R2 - 10 k - resistor (brown, black, orange)
R3 - 47k - resistor (yellow, violet, orange)
R4 - 1k2 - resistor (brown, red, red)
R5 - 10 k - resistor (brown, black, orange)
B1 - 3 or 6 V - 2 or 4 small batteries
Miscellaneous: Printed Circuit Board or Terminal Strip, mounting box, buttons for potentiometers, battery holder, insulated terminals of different colors, wires, welding, etc.


