With adaptations, we can transform it into an analog / digital converter to power a computer or other system which makes decisions in a house, depending on the position of the sensed objects.
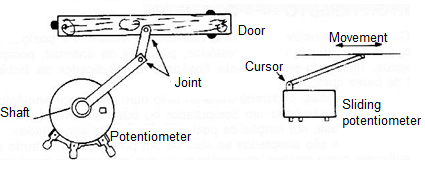
The sensors are coupled to the shaft of a potentiometer, both sliding and rotating, depending on what is to be monitored. The scale of an instrument can then be calibrated in order to have the indication of the angles or distances (displacements). The device power consumption is very low, and even powered by cell batteries, it can stay on for long periods of time.
In our project, we give two sensors for the same circuit, which are switched using a 1 pole x 2 position switch. However, the reader can perfectly use many sensors, exchanging the switch for one of as many positions as the monitored sensors are. The circuit is powered by two small common cell batteries.
Features:
- Supply voltage: 3 V
- Maximum current drained: 200 gA
- Indication type: analog
How it Works
What we have is a circuit which simply converts resistances into currents, where the resistance depends on the position of the shaft or a cursor of a common potentiometer, preferably of the linear type. Coupling the shaft of this potentiometer to a movable shaft of the object to be monitored, or to a rod that moves it, the resistance of the potentiometer, and therefore the current of the circuit, will depend on the position or opening angle of this door, as shown in Figure 1.

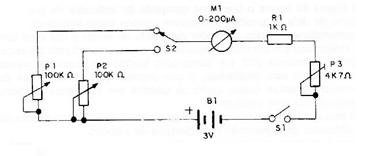
In Figure 2, we have the complete diagram of the position indicator in case two potentiometers are used as sensors.

The potentiometer has its value calculated in order to give a good range of indications in a common micro ammeter with a scale of approximately 200 µA (types with close scale can be used without problems, which allows instruments of the type low-cost VU-meter, such as those used in stereos, are used without problems).
A trimpot (P3) allows the adjustment of the full scale in order to obtain a precision in the position indication. As the maximum circuit current, which occurs when the resistance of the potentiometer used as a sensor is zero, is in the order of 200 µA, we have an extremely low consumption for the device.
On the other hand, with a good calibration the wire that goes to the sensor can be long, without affecting the accuracy of the indications. This allows you to monitor the position of distant objects such as gates, reservoir levels, etc.
Assembly
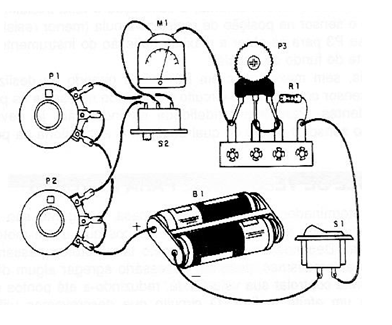
The arrangement of components on a terminal bridge is shown in Figure 3.

The M1 instrument is a low-cost micro ammeter with a full-scale range between 100 and 300 µA, being the ideal type of 200 µA. This wide variation in possible values is since we can easily adjust its operation to the P3 trimpot. The only resistor is 1/8W and the potentiometers P1 and P2 used as sensors can be rotary or sliding, preferably linear.
P3 is a common adjustment trimpot and SI is optional since the device consumption is very low and can be permanently on. For cell batteries, it will be necessary to use an appropriate support, observing their polarity at the moment of connection.
The set can be easily installed in a small plastic box of the soapbox type and the connection wires to the sensors can be quite long but must be insulated. The maximum length allowed for the wires to the sensors is 100 meters. However, the sensors must be protected against the weather, especially from humidity, which can affect the resistance of these sensors and thus result in false position indications, as we have improper increases in the circuit current.
Test and Use
For testing the device, simply turn on the power and set the switch 52 to the position that initially turns on the sensor 1. Acting on the potentiometer’s cursor there should be some movement of the instrument needle, indicating a change in the circuit current. If the instrument tends to deflect below zero (in reverse), reverse its connections or the cell battery holder connections (whichever is easier).
After functioning, the calibration is performed initially by placing the sensor in the zero-resistance position (lowest resistance) and adjusting P3 to obtain the maximum deflection of the indicator instrument (full-scale current).
Then, without moving P3 further, we rotate or slide the sensor cursor connected to the circuit and writing down the corresponding positions on the scale. For greater accuracy in the indication, the object from which we want to monitor the position must already be attached to the sensor.
R1 - 1kohm
P1, P2 - 100kohm - potentiometers - see text
P3 - 47kohm - trimpot
S1 - Simple switch
S2 - 1-pole x 2 positions switch
B1 - 3 V - 2 small batteries
M1 - 0-200 uA - microammeter
Miscellaneous:
Terminal bridge, wires, cell battery holder etc.


