Here is a dandy two-transistor metronome which you can build into a small plastic case.
You can use than old nonworking transistor radio to house this gadget. In most case you can merely remove the main circuitry but retain some parts, such as the on-off volume control potentiometer, speaker and battery holder.
If you have done this, you have just eliminated the following items: SPKR, S1, and B1.
The circuit can be powered with two or four AA cells and drains about 10 mA.
As soon as S1 is closed, the metronome stàrts clacking. By adjusting potentiometer P1 you find the “beat" or frequency of clacking you wish to set.
To calibrate, you have only to synchronize your metronome with a commercial type or any known source.
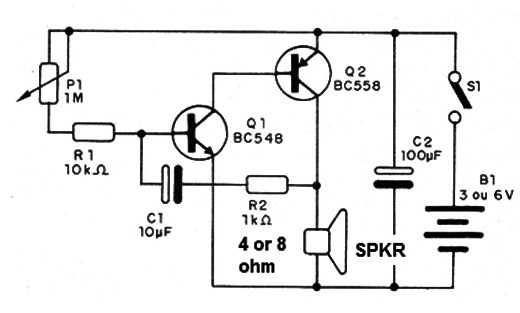
Figure 1 shows the schematic diagram for the Miní-Metronome.

At the heart of the circuit areQ1 and Q2, as a two-stage direct-coupled amplifier, which aIIows the circuit to generate intervalled pulses.
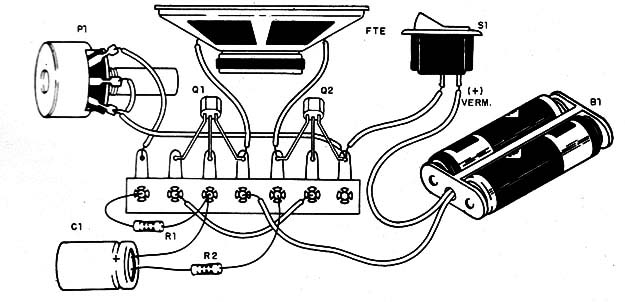
Figure 2 shows a mechanical view of the metronome, using a terminal strip as “chassis" for the small components.

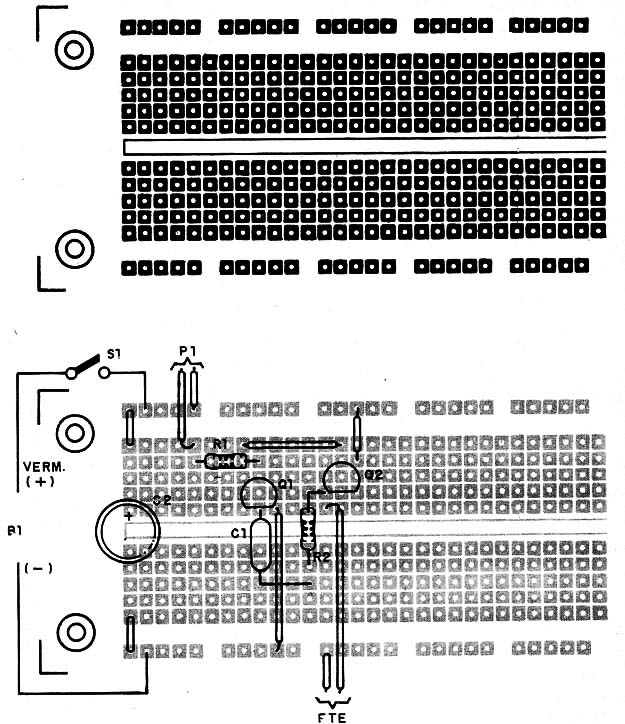
Position of the polarized components. such as C1, 02 and the trahsiston should be observed in the mounting. Solderless board mounting is shown in figure 3.

Mini Metronome
Q1 - BC548 NPN transistor
Q2 - BC558 PNP transistor
S1 - SPST toggle or slide switch
B1 – 3 V or 6 V - two or four AA cells
SPKR - 4 or 8 ohm, 2 to 4-inch Ioudspeaker
P1 - 1,000,000 ohm potentiometer
R1 - 10,000 .ohm, ¼ W, 5% resistor
R2 - 1,000.ohm, ¼ W, 5% resistor
C1 - 10 µF, 6 WVDC electrolytic capacitor
C2 - 10 pF, 6 WVDC electrolytic capacitor
Ideas to Explore
To Iearn more aboút the circuit and devices or to get better performance:
- Replace C1 by any capacitor in the range between 1 and 10 pF.
Observe what wiII happen to the beat rate. Explain it.
Replace transistor Q2 with aTlP32 on a small heatsink and power
the circuit from a 9V or 12 V power supply. You'II have extra power for
your experimental metronome and can use it in Iarger places.
Remove P1 and touch With your fingers the points where it was
wired. WilI the circuit operates? Can you explain what is going on?
Science experiments and different uses for the circuit:
The metronome can be used in gymnastic exercises or in running
to find the correct rhythm. The metronome can be housed in a small
plastic box, üpowered by cells and easily carried with the runner.
Biological experiments with sounds can be made with this device;
experiments in animal conditioning, for example.
Obs. This circuit is part of the author’s book Fun Projects for the Experimenter – TAB Books – 1998


