DIAC
The diacs are three layer switch devices with the structure and symbol shown in Figure 1.
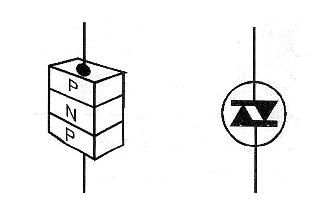
As the device uses two terminals only connected in two P regions, it has similar properties when polarized in both directions.
Thus, under normal conditions when we apply a low voltage to the diac, it biases one of the junctions in the reverse direction so that very little current flows through the device.
However, as the voltage increases, the current flowing through the component increases little until the moment at which the junction rupture voltage is inversely polarized.
At this point, the diac "turns on" and its resistance falls abruptly occurring the circulation of an intense current by the device.
In Figure 2, we have the characteristic curve of this device that shows that the trigger occurs with the polarization in any direction, because the two junctions have the same characteristics.
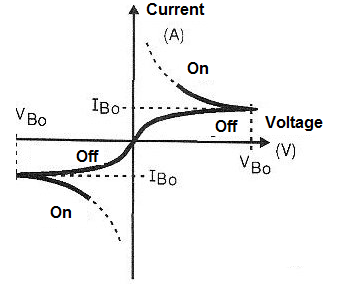
But the interesting thing about this behavior of the diac is that it has latch characteristics.
Once it conducts the current intensely, in order for it to be interrupted the applied voltage must be reduced to zero.
A simple reduction of the value of this voltage to a point before the one in which the trigger occurs does not turn it off.
Essentially, the diac can be used as a very fast voltage sensitive switch.
Diacs are widely used in triggering triacs in power controls and other similar applications.
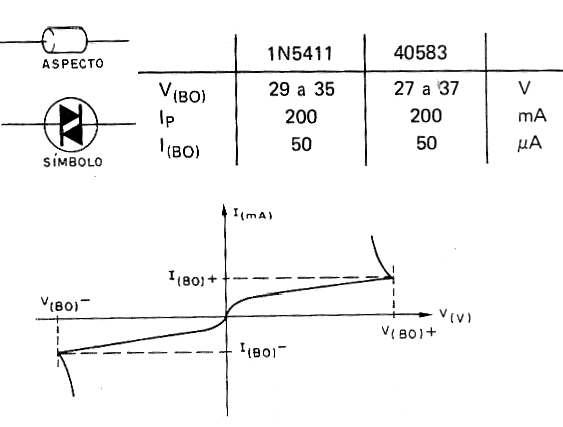
In Figure 3, we give the characteristics of two common diacs as well as their appearance and characteristic.
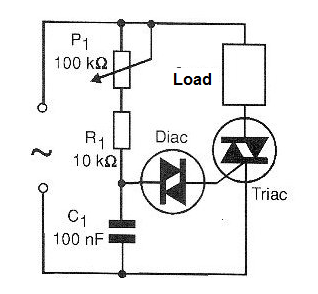
Taking advantage of the properties of the diacs, they are connected to the triacs as triggering devices, because when it reaches the desired voltage, it switches rapidly causing the triac to also trigger, as shown in Figure 4.
The trigger voltages of ordinary diacs are around 27 to 37 volts and typically operating currents range from 10 to 20 mA.
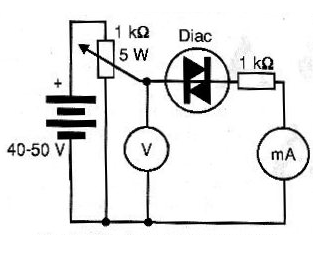
This trigger voltage can be easily detected with the test circuit of Figure 5.
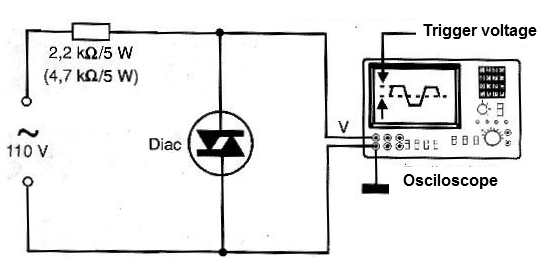
Another circuit for determining the trigger point of a diac using an oscilloscope is shown in Figure 6.
The diac is more used than the other firing devices, and can be found in several practical applications. Some of them are given below as an example.
a) Phase delay trigger
The circuit of Figure 7 may be used to trigger a triac or a comparator in a design where a pulse is needed which is produced at exactly a given phase angle of a sinusoidal signal applied to the input.
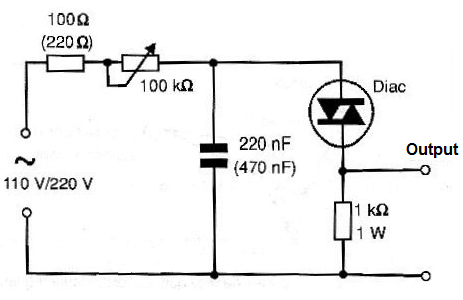
The 220 nF capacitor for the 110 V network and 470 nF for the 220 V is sized to obtain, with the potentiometer setting of 100 k ohms, delays between 0 and 180 degrees approximately.
For other frequencies of sinusoidal signals the capacitor must be recalculated.
Note that the diac will conduct and remain until the input signal has passed through zero. Between the instant of the trigger and this instant, we have the discharge of the capacitor through the load resistor and the production of the output pulse.
This means that, if the load resistor is not correctly sized, there will be no complete discharge of the capacitor and thus the next half-cycle trigger will occur at a less angle and so on leading the circuit to an undesired operation.
The amplitude of the output pulse produced by this circuit is the trigger voltage of the DIAC since it will be present in the capacitor at this time.
b) Voltage sensor
The circuit shown in Figure 8 is triggered by an input voltage determined by the setting of P1. Of course, the voltage applied at this input must be equal to or greater than that required for the Diac triggering.
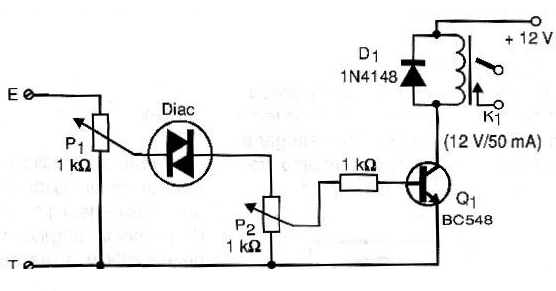
The setting of P2 is made so that we have the current necessary to saturate the transistor when the diac conducts, without there being any danger of an excessive current of base that damages it.
The relay will depend on the voltage used in the supply and also on the type of load to be controlled.
Let's remember again the latch action of this circuit which means that it keeps driving when the input voltage falls below the trigger threshold. To switch off, the input voltage must fall to zero or below the threshold.
c) Relay with a Latch
The 30 V voltage indicated in this design, shown in Figure 9, actually depends on the diac used. It should be slightly lower than that required for its trigger.
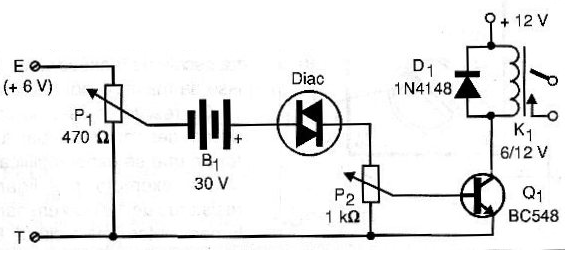
P1 sets the trigger voltage. This voltage is added to that of the battery in order to reach the diac trigger.
When this occurs, there is the conduction and polarization of the transistor which has a relay collector load.
The potentiometer or trimpot P2 must be adjusted to obtain the saturation current of the transistor in function of its gain. The relay used depends on the voltage used in its power and the current of the load to be controlled.
PUT
PUT stands for Programmable Unijunction Transistor. It is a device from the family of thyristors also destined to the SCRs and Triacs triggering.
In Figure 10, we have the symbol adopted to represent this component and its equivalent structure.
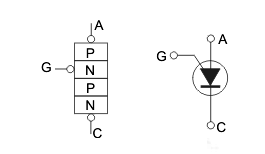
As we can see, although it is a "transistor", its symbol resembles much more a diode or an SCR with a terminal connected to the anode.
This transistor or trigger element conducts intensely when a voltage between its anode and cathode terminals reaches a certain value.
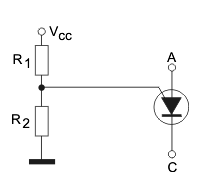
This value, as shown in Figure 11 can be programmed by a resistive network connected to the gate.
While they may still be found in some industrial applications, PUTs are not very common components in our days.
In Figure 12, we have the characteristic curve of the PUT.
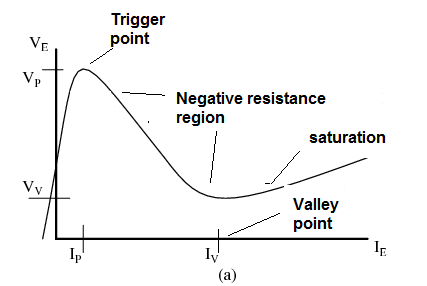
Note that at Vp we have the trigger voltage when the device goes into conduction.
From this point, the voltage drops and the current increases until the voltage of the valley is reached. In this section, we have an inverse behavior of a resistor, that is, the device has a negative resistance.
This behavior enables its use in relaxation oscillators, just like a unijunction transistor or even a neon lamp.
The operating speed of the unijunction transistor is not the highest, which means that in a relaxation oscillator, it does not generate signals which go beyond a few tens of kilohertz.
The PUTs are identified by factory numbers and the data sheets should be consulted for more information.
PUT is not a very common device in modern equipment. Basically they will be found in circuits in which it is desired to generate a low-frequency sawtooth signal.
A relatively popular PUT, but not widely used today, is BRY39.
BRY39P - Programmable Unijunction Transistor
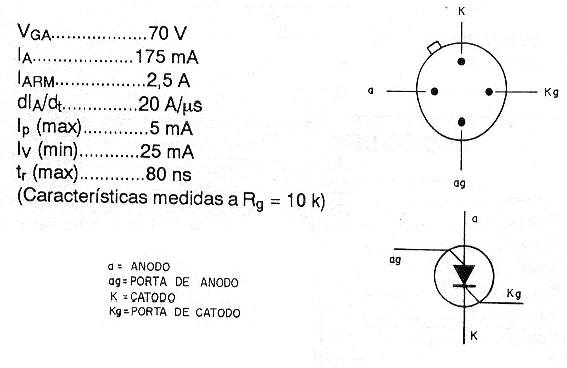
This component is a Philips PUT, unusual in our day, but quite versatile in terms of applications. In Figure 13, it is given the pinning and its characteristics.
The negative resistance characteristics of the PUT, as we have seen, allow its use in oscillators and other applications. Here are some examples:
Sawtooth Generator
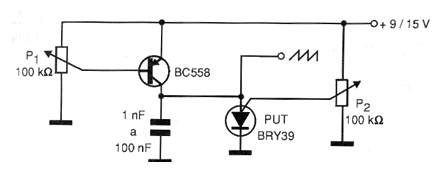
The circuit shown in Figure 14 uses a BRY39 type programmable unijunction transistor (PUT), and can generate frequencies between a few hertz and a few hundred kilohertz.
The power supply is 9 to 12 V and the P2 trimpot must be set to the trigger point and even linearity. The frequency must be set to P1.
Oscillator with a PUT
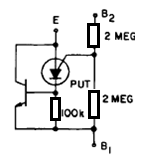
The programmable unijunction transistor of the oscillator shown in Figure 15 is 2N6027 and can be used as the basic component of a unison oscillator in this constant load configuration.
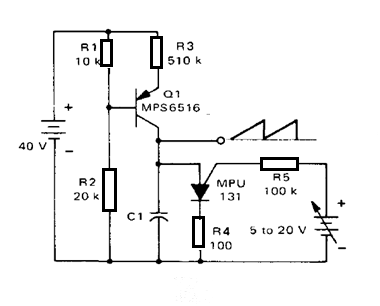
Ramp Generator Voltage Controlled Ramp Generator using a PUT
We found the circuit shown in Figure 16 in a 1974 Motorola Programmable Unijunction Transistors (PUTs) documentation.
The circuit causes the time to vary between 2 ms and 7.2 ms when the input voltage varies between 5 and 20 V. Equivalent PUTs can be employed and Q1 can be a BC557.
