The main advantage of the circuit we will describe it is to not use expensive indicators of the milliammeter or digital type.
With low cost components, the accuracy of this instrument will depend only on the tolerance of the capacitors used on the calibration scale.
The indication is audible (like the null setting) and the device works with both common batteries and a battery, which makes it completely portable.
If you do not have a capacimeter, and the multimeter for small value capacitors detects only shorts, the assembly of these capacitance bridges (one of them) is essential.
CHARACTERISTICS:
Version 1:
Supply Voltage: 6 or 9 V
Current consumption: 5 mA (max)
Capacitances range measures : 10 pF to 1 pF
Number of scales: 4
Version 2:
Supply Voltage: 3 or 6 V
Current consumption: 5 mA (typ.)
Capacitance range measures: 10 pF to 1 µF
Number of scales: 4
HOW IT WORKS
The principle of the capacitance measurement by a bridge can be easily understood if we consider the potentiometer P2 of the two circuits as two separate resistances by the cursor.
Thus, when the resistor Ra increases Rb decreases and vice versa, which occurs in the potentiometer cursor movement in one direction and the other, as shown in Figure 1.
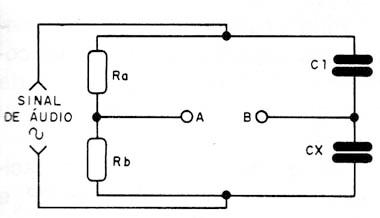
Applying in this circuit an audio signal, the capacitors C and Cx (which is the capacitance of the testing component) also form a divider circuit of voltage.
Assuming C and Cx are equal, adjusting the potentiometer cursor, when Ra is equals Rb we have a circuit equilibrium condition, and at points A and B of the buzzer there is no signal.
If the signal applied in the circuit is in the audio range, as we move the potentiometer cursor it will decrease in intensity until it disappears, precisely in the position where the bridge balances.
If Cx is not 0, we can still obtain the balance of the bridge and thus, cancel the buzzer sound, provided that Ra, Rb, C, and C2 form, in this order, a proportion.
This is because the capacitive reactance of C and Cx depend on the capacitances, in the inverse ratio to their values.
If we put in the C circuit a known value we can use many Cx of standardized values ??to calibrate the P scale and thus measure the capacitances.
In our case, to cover a good range of values, we use four values ??for C (from C2 to C5 in the circuit of the version 1) selected by a switch (S2) which provides 4 measurement scales of capacitance.
To do this kind of test we need an audio signal generator.
The bridges are the same for both versions, changing only the audio source signal.
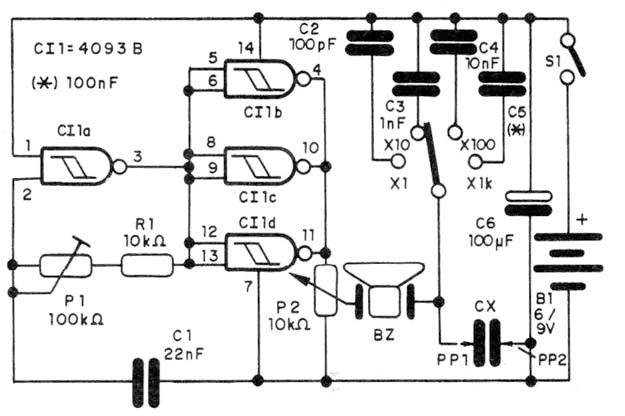
In the first version we have an oscillator built around a NAND gate of the 4093 and has its frequency set in P.
This component should be adjusted so that the frequency will be around 7 kHz, which is the value the buzzer has a higher performance.
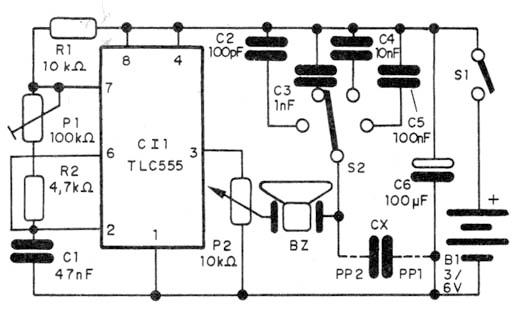
In the second version we have an integrated circuit 7555, which is the CMOS version of lower voltage and lower consumption than the known 555 and whose frequency is also set in P1 for the value of higher performance of the ceramic transducer.
ASSEMBLY
In Figure 2 we have the complete diagram of version 1.
The arrangement of components in a printed circuit board for this version is shown in Figure 3.
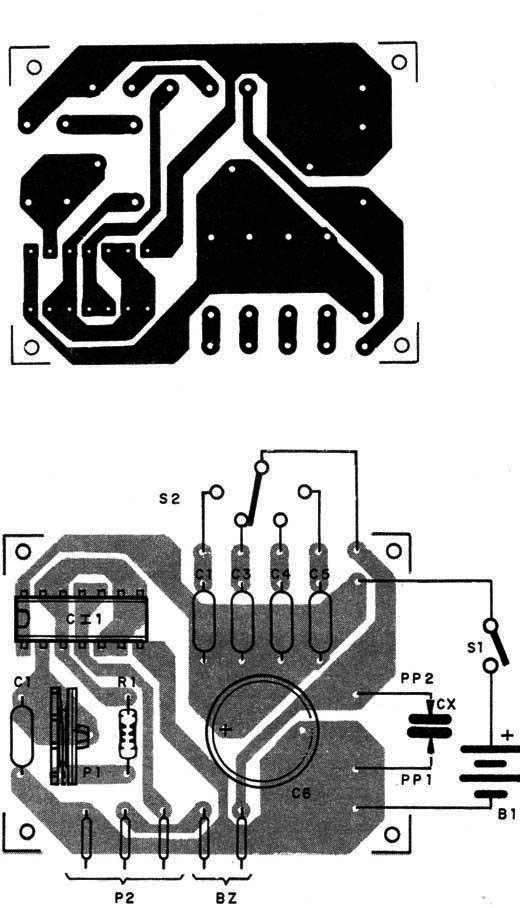
We suggest the integrated to be built in a socket, so as to increase the safety and to make the replacement easy.
P1 is a trimpot, since we adjusted it only once, but P2 must be a linear potentiometer and its button should have a very wide scale to make the reading and calibration easy.
The capacitors can be all made in ceramic or polyester, except C5 which is an electrolyte to 12 V or more of working voltage.
If it is difficult to find the S2 key, of 1 pole x 4 positions, you can use two terminals and save the capacitors used as standard, by connecting them to this point when using the device.
The buzzer BZ is any crystal or piezoelectric transducer.
You cannot use speakers or low impedance devices.
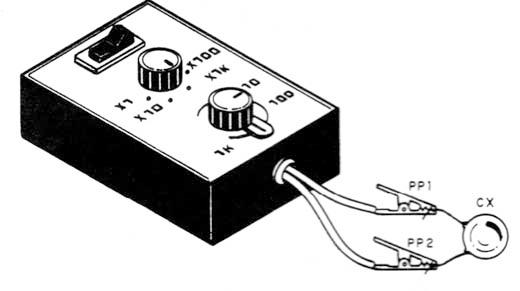
For the connection of the capacitors in test we can use two wires with claws, because the presence of hands in the terminals can affect reading low values.
The entire set fits into a plastic box, as shown in Figure 4.
For the power we can use common batteries or a battery, always observing the polarity of the support or connector.
In Figure 5 we have the complete diagram of version 2.
The arrangement of components on a printed circuit board is given in Figure 6.
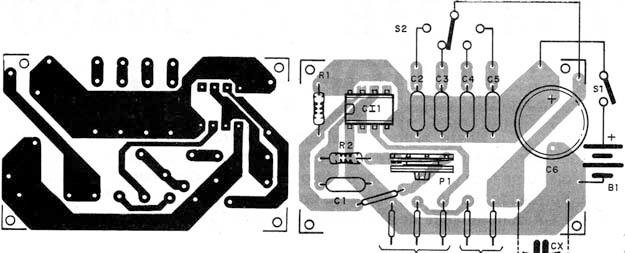
For the integrated circuit we also suggest the use of a socket.
In both projects it is important that the bridge capacitors (C2, C3, C4, C5) are of good precision, because they determine the accuracy of the scale.
TEST AND USE
Initially interconnect the alligator clips and trigger S1, taking the pot P2 to the position where the sound of the BZ transducer is stronger.
Then set P, so that we have the frequency at which the sound becomes more intense.
This usually happens around 5 to 7 kHz for common buzzers.
Then, set the switch S2 at the position x1 for calibration.
For calibration you must have commercial value capacitors in the range of 2 pF to 1 nF of good quality and accuracy (5% or less).
Put the capacitors one by one between the probes PP1 and PP2 and adjust P2 for canceling the sound.
Mark this point on the scale, the value of the capacitor used.
With the capacitors indicated the reader should get a scale as shown in Figure 7.
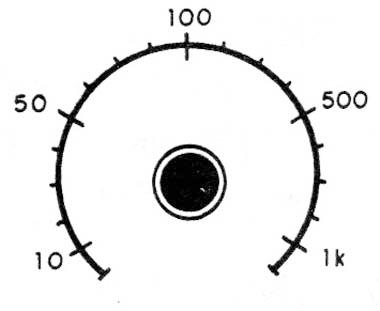
With the calibration of this scale the others will be automatically calibrated.
This means that passing S2 to the position x10 the values which lead to the equilibrium with Cx on the probes are 10 times greater than indicated on the scale.
In position 3 they are 100 times greater and at position 4 1000 times.
Proven it works you may just use the device.
For this you need to turn on the unknown capacitor (Cx) and try to adjust the null sound in P2.
If the position where it is managed is away from the center of the cursor, change the S2 position.
Then just make the reading.
If there is no equilibrium, then the capacitor is open, in short or has a value outside the range of the device, which is from about 10 pF to 1 µF.
Version 1:
CI-1 – 4093 IC
R1 – 10 k ohm
P1 – 100 k (trimmer potentiometer)
P2 – 10 k ohm potentiometer
C1 – 22 nF - ceramic capacitor
C2 – 100 pf – ceramic capacitor
C3 – 1 nF – ceramic or plastic capacitor
C4 – 10 nF – ceramic or plastic capacitor
C5 – 100 nF – ceramic or plastic capacitor
C6 – 100 µF x 12 – electrolytic capacitor
BZ – ceramic transducer
S1 – On-off switch
S2 – 1P4T – switch
B1 – 6/9 V – cells or battery
Printed circuit board, plastic box, cell holder, alligator clipes, etc.
Version 2
CI-1 TLC555 – integrated circuit
R1 – 10 k ohm
R2 – 4.7 k ohm
P1 – 100 k – trimmer potentiometer
P2 – 10 k – potentiometer
C1 – 47 nF – ceramic or plastic capacitor
C2 – 200 pF – ceramic capacitor
C3 – 1 nF – ceramic or plastic capacitor (see text)
C4 – 100 nF – ceramic or plastic capacitor
C5 – 100 µF – electrolytic capacitor
Printed circuit board, plastic box, cell holder, alligator clips, etc.


