Note: the original article was written in Portuguese and translated into English to be part of one of my books.
Features
Power supply voltage: 6 Vdc
Frequency range: 530 to 1,600 kHz
Used configuration: Hartley oscillator
Number of transistors: 1
Using this low-power MW repeater, you can send the output of a sound system to a loudspeaker placed on the other side of a room, or in another room, without the need of wires. The circuit is a low-power AM transmitter driven directly from the audio output of any sound equipment.
As the signals produced in the MW range cannot carry a great distance, the circuit is useful only for short-distance links.
Figure 1 shows how this circuit can be used in the suggested application. You can also use the circuit to send the TV audio channel to a portable MW receiver using an earphone. Using this, it is possible to watch your favorite programs late at night without disturbing neighbors or other people in your home.
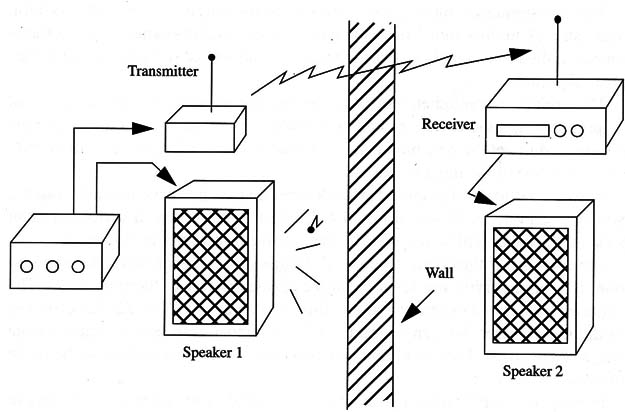
Another use for this circuit is as an experimental MW transmitter for the home. You can send the program from a CD player or a tape recorder to MW receivers in other rooms. The circuit is very simple and uses only one transistor.
How It Works
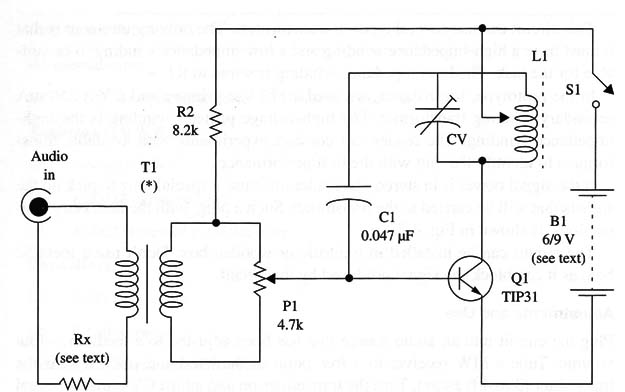
A transistor is wired as a Hartley oscillator running at a frequency between 530 and 1,600 kHz in the medium-wave band. The coil L1 and CV1 determine the frequency. The user must adjust CV1 to find a free point in the MW band.
The output power depends on the supply voltage and also on the antenna. There are two possible antenna configurations. One uses the coil’s ferrite core as the antenna. In this case, the signal will be sent to distances of only a few feet as in a through-wall link.
The other possibility is to send the signals through the ac power line. In this case, the ac power wiring of a house acts as an antenna, allowing the transmitter to cover large areas. You will be able to pick up the signal at various places in your home by placing the receiver near any power outlet, switch, or wire used for the ac power line.
You can power the unit with four AA cells or a small power supply from the ac power line. But if you increase R1 to 10,000 Ω, you can power the circuit from 9 or 12 V supplies.
The value of resistor R2 depends on the transistor gain. We recommend that the reader experiment, changing this component in the range between 2,200 and 10,000 Ω, to find the best performance.
Any NPN medium or high-power transistor that is suitable for use as an oscillator in the MW range (e. g., the BD135, TIP31, and 2N3055 components) can be used in this circuit.
The low-frequency modulation comes from the output of any audio system. You can pick up this signal from the earphone or monitor output. Using a transformer at the input signal, we can isolate the signal source from the circuit for increased security.
The trimmer potentiometer wired to the transformer is used to adjust the signal amplitude to get the correct modulation level. This trimmer potentiometer must be adjusted to get the best modulation Without any distortion, which will depend on the volume of the input signal.
If you want to use the circuit with devices that do not have an audio output, you can add one as shown in Fig. 2.
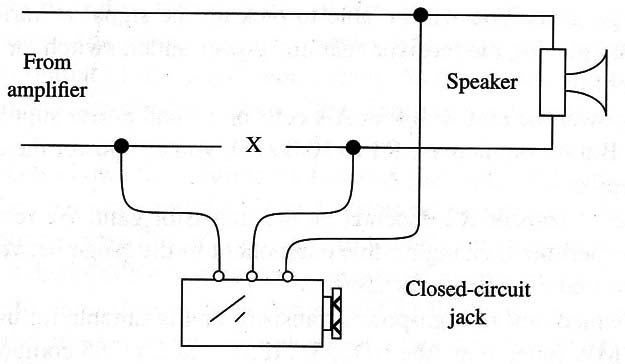
Using this circuit (with a closed-circuit jack), the speaker will be turned off whenever the transmitter is plugged in.
Observe that, if the circuit operates with high-power signal source for modulation, it is necessary to use Rx to limit the applied power to the transmitter. The value of R1 is found experimentally within the range from 22 to 220 Ω according to the input power.
We can suggest a 47 Ω component to power signals in the range of 1 to 10 W. For a common television set, this resistor will be in the range of 22 to 39 Ω.
For experimental purposes, a small antenna wired as shown in the diagram can be used. If the circuit uses the wires of the ac power line as its antenna, this point should be connected to the ground pole of the line.
Assembly
The complete schematic diagram of the MW repeater is shown in Fig. 3.
The project can be mounted on a printed circuit board as shown in Fig 4.
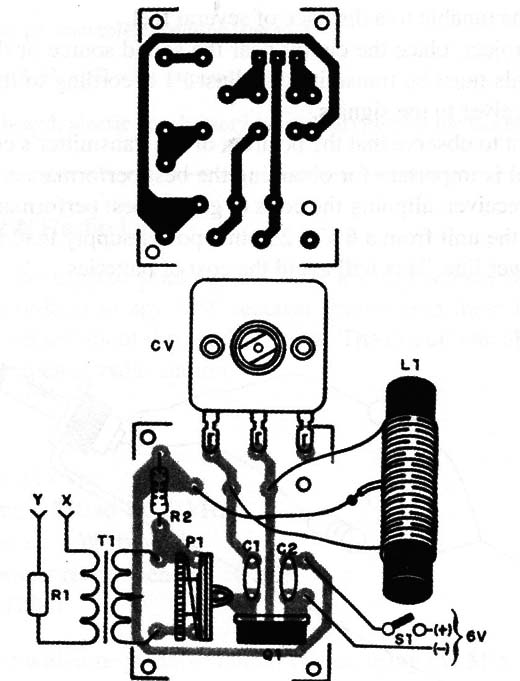
The coil is formed by 40 + 40 turns of AWG 26 to 30 enameled wire in a small ferrite core, 4 to 10 inches long. The diameter can be in the range of 1/4 to 1/2 in.
The variable capacitor is a 120 to 360 pF type. Any variable capacitor found in a nonfunctioning old MW radio can be used for this circuit. But the reader must avoid using components extracted from FM radios, as they have lower capacitance ranges. If a low-capacitance variable capacitor is used, the frequency band covered will be narrow, and it will be difficult to tune the signal.
This circuit can use several types of transformers. The only requirement is that it must have a high-impedance winding and a low-impedance winding to be suitable for the task.
The low-impedance winding is wired to R1. In the prototype, for instance, we used a 117 Vac primary and 6 V x 250 mA secondary winding transformer. The high-voltage primary winding is the high-impedance winding. The reader can conduct experiments with available transformers to identify the unit with the best performance.
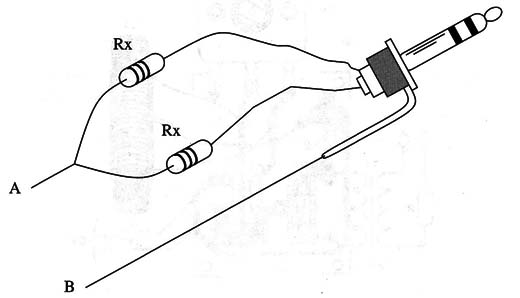
If the signal power is in stereo, the reader must use a special plug to pick up the signals that will be carried to the transmitter. Such a plug, with the necessary connections, is shown in Fig. 5.
The circuit can be installed in a plastic or wooden box. Don’t use a metallic box, as it can block the signal produced by the circuit.
Adjustments and Use
Plug the circuit into an audio source that has been adjusted to a medium output volume. Tune a MW receiver to a free point in the band and place it near the transmitter (3 to 4 ft away). T urn the transmitter on and adjust CV until the signal is tuned in. Then, using P1, adjust the modulation to obtain a pure reproduction in the receiver.
Move the receiver some distance from the transmitter to see how far the signal carries. It will be tunable to a distance of several feet.
To use the project, place the circuit near the sound source or the wall through which the signals must be transmitted. Adjust P1 according to the power source and tune the receiver to the signals.
It is important to observe that the position of the transmitter’s coil in relation to the receiver coil is important for obtaining the best performance. Try several positions for the receiver, aligning the coils to get the best performance.
You can run the unit from a 6 V X 250 mA power supply that draws its current from the ac power line. This will avoid the cost of batteries.
Semiconductors
Q1 TIP31 or equivalent power N PN silicon transistor
Resistors (1/8 W, 5%)
R1 - (see text) 1 W
R2 - 8,200 Ω -gray, red, red
P1 - 4,700 Ω - trimmer potentiometer
Capacitors:
C1 - 0.047 pF ceramic
C2 - 0.1 µF ceramic
Additional Parts and Materials:
T1 - transformer: 117 Vac primary winding; 6 V to 12 V x 250 to 500 mA secondary winding (see text)
L1 - coil (see text)
CV - 120 to 360 pF variable capacitor (see text)
B1 - 6 V, four AA, C, or D cells or power supply
Printed circuit board, plastic box, battery holder, ferrite core for the coil, wires, jack, etc.


