Features
Power supply voltage: 6, 9, or 12 Vdc
Output power: 200 mW (typical)
Frequency range: 88 to 108 MHz (or VHF)
Range: half a mile and more
Current drain: from 50 mA to 100 mA (typical)
Here we describe a small FM (or VHF) transmitter intended for general purposes and also for espionage. The transmitter can send the signals to distances up to 1,500 ft if powered from a 6 V supply, and 1 mile if powered from a 9 V supply.
The basic difference between this circuit and the other found in this section and in the site is the presence of an opamp in the modulation stage.
With a very high gain characteristic, the circuit can increase the amplitude of very weak sounds picked up by the microphone before applying the audio signals to the transmitter.
This means that the circuit can be used for remote listening, as required in espionage, where the sounds to be heard are very weak.
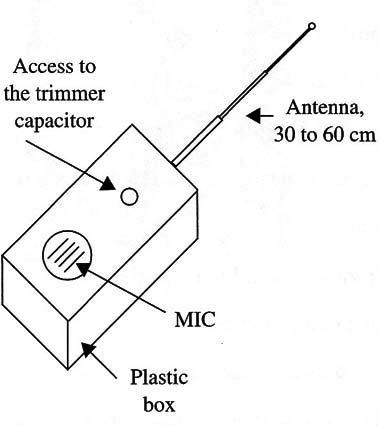
Another important point to observe is that the amplifier gain can be programmed by only one component. This circuit, as many others described in this site, can also be installed in a small plastic box as shown in Fig. 1.

How It Works
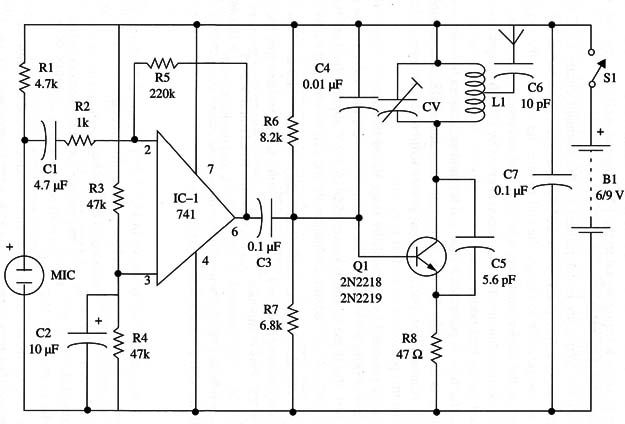
The high-frequency stage has the conventional configuration seen in the projects presented in this section. The transistor can be a 2N2218, 2N2219, or a BD135, all of which are very easy to find.
These transistors have collector currents rated up to 1 A and can produce a strong signal in the FM range as well as in the low VHF band between 40 and 88 MHz.
The operational frequency is determined by the resonant circuit L1/CV. CV must be adjusted to a free point in the FM band as recommended in the other projects in the site.
It is also possible to change the coil to tune the circuit to the low VHF band. Of course, the reader must have a receiver that can receive that band.
The feedback that maintains the oscillation is given by C5. This capacitor must be a ceramic type for best performance.
The transistor base is polarized by R6 and R7, and the current between collector and emitter is limited by R8. By increasing the value of R8, it is possible to reduce power consumption, but the output power will be also reduced. The advantage is that this procedure extends battery life.
Modulation is provided by an amplifier stage based in a single opamp. If the circuit is powered from a 6 V supply, the opamp must be a low-voltage type such as the
CA3140. But if the circuit is powered from a 9 V supply, you can use the 741.
The 741 IC is a very common component and can be obtained easily from many dealers. This lC’s non-inverting input is wired to a voltage divider formed by R3 and R4.
This divider gives half of the supply voltage to bias this input.
The audio signal is applied to the inverting input, where we also find the feedback resistor R5. This component fixes the amplifier gain. The reader can make experiments with this component, trying to find a value appropriate for the amplitude of the sounds he intends to pick up.
For strong sounds, for instance, a resistor between 0 (i.e., a short circuit between pins 2 and 6) and 100 k can be used.
For weak sounds, the resistor must be between 150 k ohm and 1.5 M ohm).
The suggested value of 220 k ohm is indicated for both weak and medium-intensity sounds.
The radio signals are sent into the space via a telescoping antenna or a piece or wire 20 to 40 inches long. As with other projects, the reader can determine the proper tap in the coil for the antenna connection.
Assembly
The circuit of this transmitter is shown in Fig. 2.

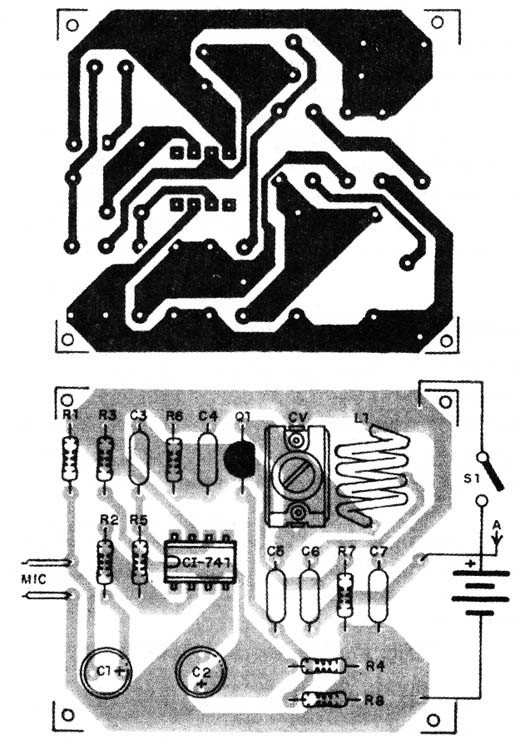
The circuit must be assem- bled on a printed circuit board as shown in Fig. 3.

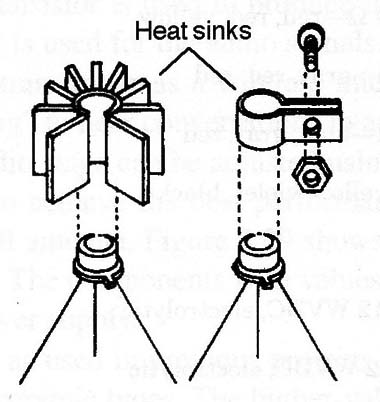
Figure 4 shows how a small heat sink can be placed on the transistor.

If you find it difficult to work with ICs, you may find it easier to install that device in an eight-pin dual in-line package (DIP) socket.
The coil L1 consists of 4 turns of AWG 18 to 22 enameled wire on a coreless form 1 cm in diameter. The tap for the antenna will be at the second or third turn.
To operate the circuit in the range between 40 and 80 MHz, the coil will be formed by 6 to 8 turns of the same wire in a 1 cm diameter coreless form (air core).
Any plastic or porcelain trimmer with capacitances in the range between 20 and 40 pF can be used (2-20 to 4-40).
An interesting alternative to the LC circuit is optional. Use a common intermediate frequency (IF) transformer coil (with ferrite core) and fix the parallel ceramic capacitor (replacing CV) at 2.2 or 3.3 pF.
This way, you can tune the circuit using the ferrite core instead of the trimmer.
Tolerance, dissipation, and voltage ratings for all the components are indicated in the parts list. For electrolytic capacitors, the recommended values are lower.
The electret microphone can be placed far from the circuit but, in this case, it must be wired using shielded cable to avoid noise and hum.
The recommended power supply is formed by six to eight AA or D cells. Another power supply choice is a nicad cell. Don’t use a small 9 V battery for this task, as the current drain is very high, and the battery will run down in just a few minutes.
Testing and Using the Circuit
The procedure is the conventional one: tune an FM receiver to a free point in the FM (or VHF) band. Place the receiver near the transmitter.
Tune the transmitter by adjusting CV. If acoustic feedback is produced, reduce the receiver volume. As the circuit is very sensitive to weak sounds, it would be better to use an earphone plugged into the receiver when making these adjustments.
How to use the transmitter is up to the reader. For surveillance applications, place it far away from large metallic objects that can affect signal propagation.
Semiconductors
IC1 - 741 operational amplifier, integrated circuit (or CA3140 if the circuit is powered from a 6 V supply)
Q1 - 2N2218 or 2N2219 NPN transistor (see text)
Resistors (1/8 W, 5%)
R1 - 4,700 ohm - yellow, Violet, red
R2, R3, R4, R8 - 47,000 ohm - yellow, Violet, orange
R5 - 220,000 ohm - red, red, yellow
R6 - 8,200 ohm - gray, red, red
R7 - 6,800 ohm -blue, gray, red
R8 - 47 ohm-yellow, Violet, black
Capacitors
C1 - 4,7 µF/ 12 WVDC, electrolytic,
C2 - 10 µF/ 12 WVDC, electrolytic
C3, C7 - 0.1 µF ceramic
C4 - 0.01 µF ceramic
C5 - 5.6 pF ceramic
CV - trimmer (see text)
Additional Parts and Materials
MIC - electret microphone (two terminals)
S1 - SPST toggle or slide switch
L1 - coil
B1 - 6 to 12 V, battery, cells, etc. (see text)
Printed circuit board, plastic box, battery holder, telescoping antenna (optional), wires, solder, etc.


