The system used for capturing heartbeats is the same as many medical device: it is based on the change in the transparency of the finger when the blood is pumped by the heart.
Since this pumping occurs in the form of pulses, there is a constant oscillation in the volume of blood passing through a person's finger, thus, altering its transparency.
Simply use a light emitter (LED) and a sensor (photodiode) to detect these variations.
Looking at Figure 1, we see that by placing a finger between the two, the signal obtained in the diode is variable and corresponds in frequency to the heart rate of a person.
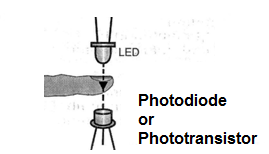
By processing this signal we can trigger a measurement scale of LEDs or drive an external circuit.
This is exactly the operating principle of our device that uses two operational amplifiers and an integrated drive circuit for an LED scale.
Depending on the purpose of the appliance, the assembler can make changes to the circuit, such as gaining and even scaling LEDs.
The circuit, although powered with 12 V, has a relatively low consumption, and can be easily built in a small plastic box.
Even the sensor, which consists of an LED and a photodiode, can be improvised with little skill in dealing with common materials such as plastic, wood, etc.
HOW IT WORKS
The emitter, a common LED, is permanently energized by a continuous current that runs through it.
This way the LED emits light with constant intensity.
The sensor is placed so that the emitting LED light has to pass through the finger of the person who will have the measured heart rate or simply start an indicating circuit.
The signal obtained in the photo sensor is taken to the input of a sensitive operational amplifier with field effect transistors of type TL071.
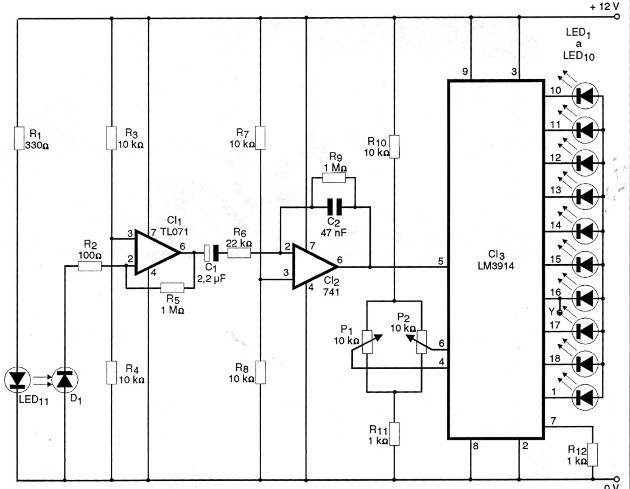
The gain of this amplifier is basically given by the ratio of R5 to R2.
We can change the value of R5 to change the gain.
The signal from this amplifier passes through a capacitor C1, eliminating the continuous component and is delivered to the inverting input of a second operational amplifier, this of the common type, the known 741.
The gain of this second operational amplifier is determined primarily by the ratio of R9 to R6.
Again, we can change R9 to modify this gain.
The capacitor C2 causes this amplifier to have its gain greatly reduced at high frequencies given the strong feedback it provides.
This ensures that the circuit responds only to the low frequencies that correspond to the heart rate.
This component can also be changed according to the needs of the designer.
The signal obtained in this amplifier has good intensity and is applied to the input of a scale of LEDs which consists of the integrated circuit LM3914 by National.
This circuit consists of a bar graph gauge where the end-of-scale adjustments are made by trimmers P1 and P2.
These are the only adjustments of the device.
There are 10 indicator LEDs on the device output which should oscillate according to the heart beat of the person whose finger is on the sensor.
To trigger an external device, a pulse in each cycle can be obtained on pin 16 of LM3914 (point X) of the diagram.
These pulses consisting of going to the low level of the indicated point, when the LED is energized, can be taken to a logic gate to drive an external circuit.
The entire circuit is powered by a stabilized 12 V supply and the higher consumption is due only to the LEDs being triggered.
ASSEMBLY
In Figure 2 we have the complete diagram of our Heart Sensor, without the power supply.
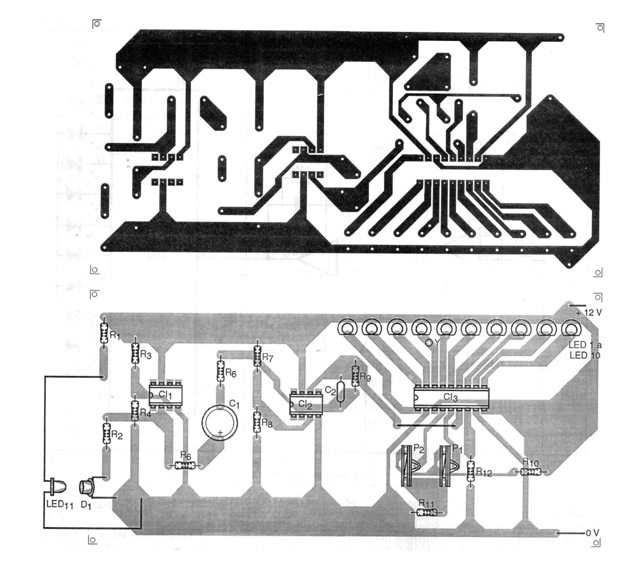
The arrangement of the components on a printed circuit board is shown in Figure 3.
The LED and the photo sensor must be built separately to allow attachment to the patient's finger.
In Figure 4 we show how to do this based on a plastic tube with approximately 1.5 cm in diameter.
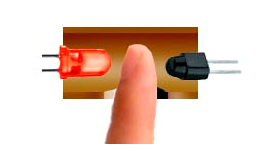
A 1/2 inch PVC cable can serve this purpose.
The photodiode wire must be shielded so that the occasional snores picked up by the circuit, which is of a very high impedance, are not amplified and affect the operation of the circuit.
The resistors are 1/8 W or larger and the capacitors (only 2) have their minimum voltage and type specifications listed in the material list.
For added safety it will be interesting to assemble the integrated circuits into sockets.
Scale LEDs can be of any type or color.
In Figure 5 we give a suggestion of power supply for this circuit.
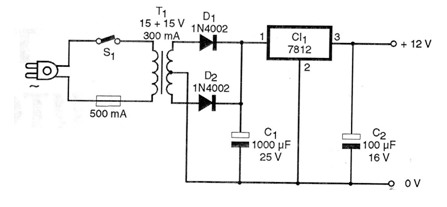
The integrated voltage regulator circuit must be built in a small heat radiator.
The transformer has a secondary 15 +15 V with at least 300 mA and primary winding according to the local power grid voltage.
The minimum working voltages of the capacitors used are indicated in the figure itself.
The housing of the device may be of plastic, but it is important to be careful with the length of the connections through which signals of small intensity, specifically the photosensor, pass.
There may be noises which may affect the operation of the unit.
If this occurs, these connections should be redone with shielded wires.
TEST AND USE
To test, it is enough to turn on the power of the circuit, put your index finger on the sensor and adjust P1 and P2 so that the LEDs oscillate with amplitudes as wide as possible, accompanying the heart beats.
Once the adjustment has been made, only use the device, remembering that interference from fluorescent lamps should be avoided and that preferably the sensor with the person's finger should be in a poorly lit area.
For the external interface, just connect the circuit to the Y-point.
We recall that the external interface trigger pulse is a negative pulse.
The Y point goes to the low level in the presence of that pulse.
The duration of the pulse depends on the setting of the trimpots.
To obtain a pulse of constant duration, which may be important in certain applications, we suggest the use of a monostable.
For this purpose, the pin 2 of a 555 can be connected (via a capacitor of approximately 1 uF) to this point, since this integrated circuit in the monostable version is triggered by going to the low level.
Semiconductors:
Cl1 - TLO71 - integrated circuit, IinMOS operational amplifier
CI2 - 741 - integrated circuit, operational amplifier
Cl3 - LM3914 - integrated circuit, LED scale
LED1 to LED11 - Common LEDs
D1 - Large surface photodiode
Resistors: (1/8 W, 5%)
R1 - 330 ohm
R2 - 100 ohm
R 3, R 4, R 7, R 5, R 10 - 10 k ohm
R5, R9 -1 M ohm
R6-22k ohm
R11, R12 -1k ohm
P1, P2 - 10 k ohm - trimpots
Capacitors:
C1- 2.2 uF / 16 V - electrolytic
C2-47 nF - ceramic or polyester
Miscellaneous:
Printed circuit board, assembly box, material for the power supply, material for the sensor, wires, welding, etc.


