Almost all electronic designs with microcontrollers make use of the timers for their operation. One of the most common techniques is to use a physical Timer (TIM) microcontroller to generate an interruption every millisecond and from this interruption increment the decreasing counters to generate the periods of the timers.
This method has a drawback, when the project uses many timers because the interruption routine can use a lot of CPU time. Another technique is to use delay timers, but these have the drawback of not being able to read the microcontroller inputs during their execution.
In this article, we will describe how to use and encode dynamic timers that eliminate the mentioned drawbacks.
DINAMIC TIMERS
This method uses a counter only at the physical timer interrupt (TIM) and from this counter it generates all necessary interruptions. The code presented in this article can be adapted to any ARM microcontroller of any brand/manufacturer or any 8/16 bit microcontroller with good RAM.
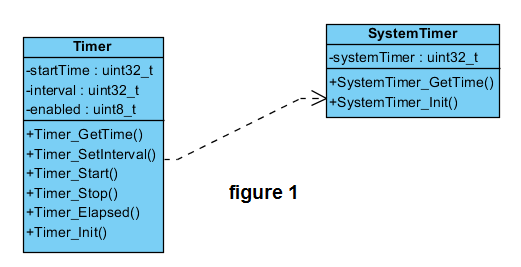
The source code presented in this article was tested on the microcontroller STM32L152RB, a 32-bit ARM from ST. In Figure 1 we can see a source file diagram for the code presented in this article.

The code for the interruption is as follows:
extern uint32_t systemTimer;
void TIM3_IRQHandler()
{
if (TIM_GetITStatus(TIM3, TIM_IT_Update) != RESET)
{
TIM_ClearITPendingBit(TIM3, TIM_IT_Update);
systemTimer++;
}
}
The code for this article uses Microcontroller Timer 3 (TIM3), but any timer that is configured to perform an interruption every 1 millisecond can be used.
Next, you must implement a SystemTimer file that uses the systemTimer counter. The code will be:
#include "SystemTimer.h"
uint32_t systemTimer;
****************************************************************/
uint32_t SystemTimer_GetTime()
{
return systemTimer;
}
****************************************************************/
void SystemTimer_Init()
{
systemTimer = 0;
}
This source file uses two functions: SystemTimer () which returns the value of the systemTimer counter and the SystemTimer () function which initializes the SystemTimer counter from zero. This last function is called at the reset of the microcontroller.
The SystemTimer input file will be:
uint32_t SystemTimer_GetTime(void);
void SystemTimer_Init(void);
Now, we must implement a file which uses the functions of the SystemTimer c source file to create the dynamic timers. This file can be called Timer and its code will be:
#include "Timer.h"
#include "SystemTimer.h"
****************************************************************/
uint32_t Timer_GetTime(Timer *p)
{
uint32_t systemTimer;
uint32_t timeSpan;
if(p->enabled == false)
return 0;
if(p->enabled != true)
return 0;
systemTimer = SystemTimer_GetTime();
if(systemTimer < p->startTime)
{
}
else
{
timeSpan = systemTime - p->startTimer;
}
return timeSpan;
}
****************************************************************/
void Timer_SetInterval(Timer *p, uint32_t interval)
{
p->interval = interval;
}
****************************************************************/
void Timer_Start(Timer *p)
{
p->startTime = SystemTimer_GetTime();
p->enabled = true;
}
****************************************************************/
void Timer_Stop(Timer *p)
{
p->enabled = false;
}
****************************************************************/
boolean Timer_Elapsed(Timer *p)
{
uint32_t timeSpan = Timer_GetTime(p);
if(timeSpan == 0)
return false;
if(timeSpan < p->interval)
return false;
Timer_Stop(p);
return true;
}
****************************************************************/
void Timer_Init(Timer *p, uint32_t interval)
{
p->startTime = 0;
p->interval = interval;
p->enabled = false;
}
The Timer Start () function is used to start the timer and the Timer Stop () function is used to stop the timer. The Timer Init () function is used to initialize the timer and is called at the microcontroller reset.
The Timer Interval () function is used to program the interval in microseconds of the timer. This interval can also be programmed in the Timer Init () function;
To know when the timer has reached its set time, the Timer Elapsed () function is used which returns "valid" when the time elapses. To use the system timer we created earlier with the interruption of the physical timer 3 and the SystemTimer c source file, we used the timer function GetTime ().
The Timer h header file will be:
typedef struct
{
uint32_t startTime;
uint32_t interval;
boolean enabled;
}Timer;
uint32_t Timer_GetTime(Timer *p);
void Timer_SetInterval(Timer *p, uint32_t interval);
void Timer_Start(Timer *p);
void Timer_Stop(Timer *p);
boolean Timer_Elapsed(Timer *p);
void Timer_Init(Timer *p, uint32_t interval);
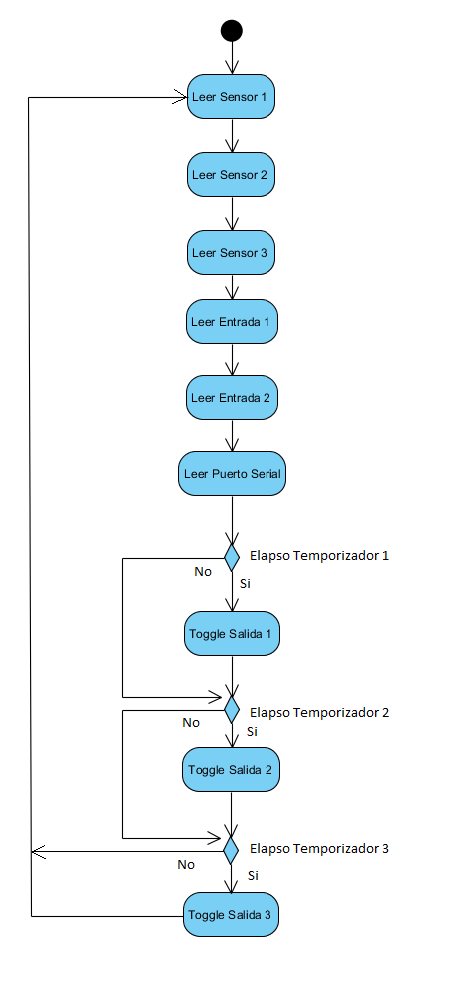
Figure 2 shows the block diagram of a typical microcontroller hardware, where we have several inputs and outputs. In Figure 3 we can see that, using these dynamic timers, we can read the inputs and execute the timings, without stopping the main program.


In the next main.c source file we can see how to use the dynamic timers.
#include "Timer.h"
Timer salida_1_Timer;
Timer salida_2_Timer;
Timer salida_3_Timer;
int main()
{
Init_IO();
Timer_Init(&salida_1_Timer, 3000);
Timer_Init(&salida_2_Timer, 1000);
Timer_Init(&salida_3_Timer, 200);
while(1)
{
if(Timer_Elapsed(&salida_1_Timer))
{
Toggle_Saladia_1();
}
if(Timer_Elapsed(&salida_2_Timer))
{
Toggle_Saladia_2();
}
if(Timer_Elapsed(&salida_3_Timer))
{
Toggle_Saladia_3();
}
}
}
In the following articles we will use these dynamic timers in examples of in microcontroller projects.


